Mosica数据增强

Yolov4中使用了Mosica数据增强方法,能够在有限数据集情况下极大程度的增加增强样本量。本文对Mosica数据增强方法进行Python代码实现介绍

数据准备

本实现需要以下相关数据和文件准备

  • VOC数据集(本实验使用的是VOC2007)

  • classes文件

将VOC数据集预先经过处理后,得到一个合并所有标注信息的文件’annotations.txt’,其中每一行是图像绝对路径和BoundingBox和标签信息

1
2
3
4
5
6
7
VOCdevkit/VOC2007/JPEGImages/000005.jpg 263,211,324,339,8 165,264,253,372,8 5,244,67,374,8 241,194,295,299,8 277,186,312,220,8
VOCdevkit/VOC2007/JPEGImages/000007.jpg 141,50,500,330,6
VOCdevkit/VOC2007/JPEGImages/000009.jpg 69,172,270,330,12 150,141,229,284,14 285,201,327,331,14 258,198,297,329,14
VOCdevkit/VOC2007/JPEGImages/000012.jpg 156,97,351,270,6
VOCdevkit/VOC2007/JPEGImages/000016.jpg 92,72,305,473,1
VOCdevkit/VOC2007/JPEGImages/000017.jpg 185,62,279,199,14 90,78,403,336,12
...

导入依赖包

1
2
3
4
import random
import numpy as np
from PIL import Image, ImageDraw, ImageFont
import matplotlib.pyplot as plt
  • random用于生成随机数,以进行随机参数的变换

  • numpy用于图像和numpy的转换以及数据处理

  • Image用于图像加载和变换

  • ImageDraw和ImageFont用于在图像上画BoundingBox

  • pyplot用于绘图显示图像

定义一些工具函数

1
2
3
# 用于生成指定范围的随机数
def random_rate(a=0, b=1):
return np.random.rand()*(b-a) + a
1
2
3
4
5
6
# 用于从classes文件得到classes数组
def get_classes(classes_path):
with open(classes_path, encoding='utf-8') as f:
class_names = f.readlines()
class_names = [c.strip() for c in class_names]
return class_names
1
2
3
4
5
6
7
8
9
10
11
12
13
14
# 在图像上绘制box矩形框以及标签文字
def draw_bndbox(image, bboxes, classes):
for box in bboxes:
label = classes[int(box[-1])]
font = ImageFont.truetype(font='SIMYOU.TTF',
size=np.floor(1.5e-2 * np.shape(image)[1] + 15).astype('int32'))
draw = ImageDraw.Draw(image)
label_size = draw.textsize(label, font)
text_origin = np.array([box[0], box[1] - label_size[1]])
draw.rectangle([box[0], box[1], box[2], box[3]], outline='red',width=3)
draw.rectangle([tuple(text_origin), tuple(text_origin + label_size)], fill='red')
draw.text(text_origin, str(label), fill=(255, 255, 255), font=font)
del draw
return image

图像样本显示

1
2
3
4
5
6
7
8
# 变量预先设置
input_shape = [640, 640]
max_boxes = 100
annotation_path = 'annotations.txt'
with open(annotation_path, encoding='utf-8') as f:
train_indexes = f.readlines()
classes_path = 'voc_classes.txt'
classes = get_classes(classes_path)

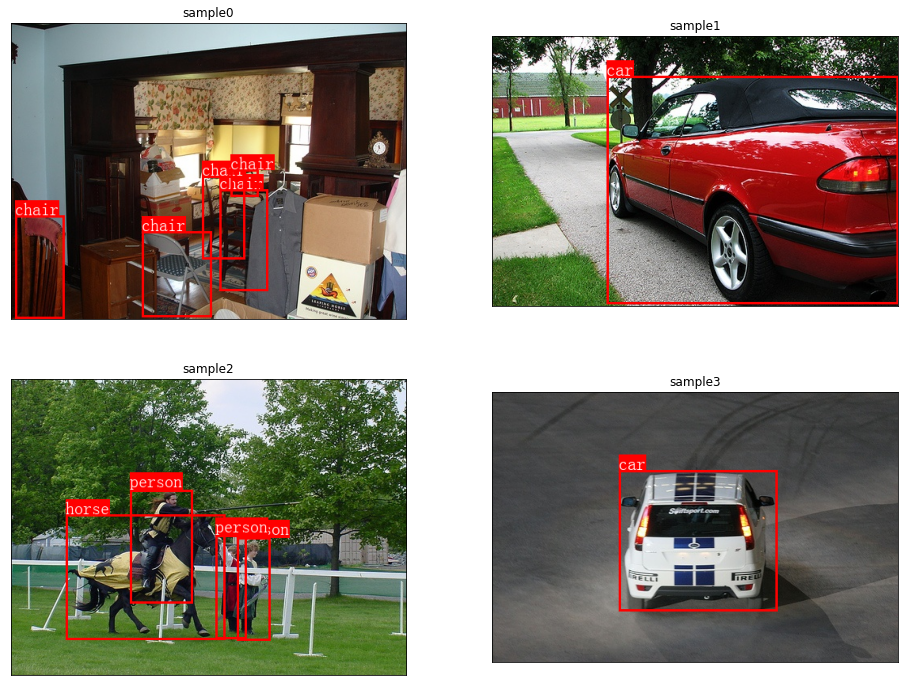
Mosica数据增强是以4副图像合并为一副图像,首先获取4副图像进行显示

1
2
3
4
5
6
7
8
9
10
11
12
plt.figure(figsize=(16, 12))
samples = train_indexes[:4]
for i, sample in enumerate(samples):
line_content = sample.split()
bboxes = np.array([np.array(list(map(int,box.split(',')))) for box in line_content[1:]])
image = Image.open(line_content[0])
image = draw_bndbox(image, bboxes, classes)
plt.subplot(2,2,i+1)
plt.xticks([])
plt.yticks([])
plt.title('sample{}'.format(i))
plt.imshow(image)

Mosica处理

1
2
3
4
5
6
7
8
9
10
11
12
13
14
15
16
17
18
19
20
21
22
23
24
25
26
27
28
29
30
31
32
33
34
35
36
37
38
39
40
41
42
43
44
45
46
47
48
49
50
51
52
53
54
55
56
57
58
59
60
61
62
63
64
65
66
67
68
69
70
71
72
73
74
75
76
77
78
79
80
81
82
83
84
85
86
87
88
89
90
91
92
93
94
95
96
97
98
99
100
101
102
103
104
105
106
107
108
109
110
111
112
index = 0
image_datas = []
boxes_datas = []
# 生成4副图像的分割比例和坐标
min_offset_x = random_rate(0.3, 0.7)
min_offset_y = random_rate(0.3, 0.7)
cutx = int(w * min_offset_x)
cuty = int(h * min_offset_y)
plt.figure(figsize=(16, 12))
for sample in samples:

# 读入图像和box
line_content = sample.split()
image = Image.open(line_content[0])
iw, ih = image.size
box = np.array([np.array(list(map(int,box.split(',')))) for box in line_content[1:]])

# 随机翻转
flip = random_rate() < 0.5
if flip and len(box)>0:
image = image.transpose(Image.FLIP_LEFT_RIGHT)
# 图像进行翻转,box也需要翻转
box[:, [0,2]] = iw - box[:, [2,0]]

# 图像长宽比例和大小随机变换
beta1 = random_rate(1-jitter, 1+jitter)
beta2 = random_rate(1-jitter, 1+jitter)
rate = iw/ih*beta1 / beta2
scale = random_rate(.4, 1)
if rate < 1:
nh = int(scale*h)
nw = int(nh*rate)
else:
nw = int(scale*w)
nh = int(nw/rate)
image = image.resize((nw, nh), Image.BICUBIC)

# 计算每幅图像的左上角相对最后生成图的偏移
if index == 0:
dx = cutx - nw
dy = cut - nh
elif index == 1:
dx = icutx- nw
dy = cutx
elif index == 2:
dx = cutx
dy = cuty
elif index == 3:
dx = cutx
dy = cuty - nh

# 创建与最终合成图大小一致的灰色背景图,用于将变换图粘贴到其中
new_image = Image.new('RGB', (w,h), (128,128,128))
new_image.paste(image, (dx, dy))

image_data = np.array(new_image)

bboxs_data = []

# 图像进行了长宽比例和大小随机变换,box也需要进行尺度变换,并限制边界
if len(box)>0:
np.random.shuffle(box)
box[:, [0,2]] = box[:, [0,2]]*nw/iw + dx
box[:, [1,3]] = box[:, [1,3]]*nh/ih + dy
box[:, 0:2][box[:, 0:2]<0] = 0
box[:, 2][box[:, 2]>w] = w
box[:, 3][box[:, 3]>h] = h
box_w = box[:, 2] - box[:, 0]
box_h = box[:, 3] - box[:, 1]
box = box[np.logical_and(box_w>1, box_h>1)]
bboxs_data = np.zeros((len(box),5))
bboxs_data[:len(box)] = box

plt.subplot(2,2,index+1)
plt.xticks([])
plt.yticks([])
plt.title('sample{}'.format(index))
new_image = draw_bndbox(new_image, box, classes)
plt.imshow(new_image)

index = index + 1

image_datas.append(image_data)
boxes_datas.append(bboxs_data)

# 生成最终合成图,并将4副图像粘贴到对应位置
new_image = np.zeros([h, w, 3])
new_image[:cuty, :cutx, :] = image_datas[0][:cuty, :cutx, :]
new_image[cuty:, :cutx, :] = image_datas[1][cuty:, :cutx, :]
new_image[cuty:, cutx:, :] = image_datas[2][cuty:, cutx:, :]
new_image[:cuty, cutx:, :] = image_datas[3][:cuty, cutx:, :]
new_image = np.array(new_image, np.uint8)
new_image = Image.fromarray(new_image)

'''
这里可以进行一些色域变换
'''

# box处理
new_boxes = merge_bboxes(boxes_datas, cutx, cuty)
box_data = np.zeros((max_boxes, 5))
if len(new_boxes)>0:
if len(new_boxes)>max_boxes: new_boxes = new_boxes[:max_boxes]
box_data[:len(new_boxes)] = new_boxes

plt.figure(figsize=(12, 8))
plt.xticks([])
plt.yticks([])
plt.title('merge')
new_image = draw_bndbox(new_image, new_boxes, classes)
plt.imshow(new_image)
plt.show()

box合并处理的函数

1
2
3
4
5
6
7
8
9
10
11
12
13
14
15
16
17
18
19
20
21
22
23
24
25
26
27
28
29
30
31
32
33
34
35
36
37
38
39
40
41
42
43
44
def merge_bboxes(bboxes, cutx, cuty):
merge_bbox = []
for i in range(len(bboxes)):
for box in bboxes[i]:
tmp_box = []
x1, y1, x2, y2 = box[0], box[1], box[2], box[3]
if i == 0:
if y1 > cuty or x1 > cutx:
continue
if y2 >= cuty and y1 <= cuty:
y2 = cuty
if x2 >= cutx and x1 <= cutx:
x2 = cutx

if i == 1:
if y2 < cuty or x1 > cutx:
continue
if y2 >= cuty and y1 <= cuty:
y1 = cuty
if x2 >= cutx and x1 <= cutx:
x2 = cutx

if i == 2:
if y2 < cuty or x2 < cutx:
continue
if y2 >= cuty and y1 <= cuty:
y1 = cuty
if x2 >= cutx and x1 <= cutx:
x1 = cutx

if i == 3:
if y1 > cuty or x2 < cutx:
continue
if y2 >= cuty and y1 <= cuty:
y2 = cuty
if x2 >= cutx and x1 <= cutx:
x1 = cutx
tmp_box.append(x1)
tmp_box.append(y1)
tmp_box.append(x2)
tmp_box.append(y2)
tmp_box.append(box[-1])
merge_bbox.append(tmp_box)
return merge_bbox

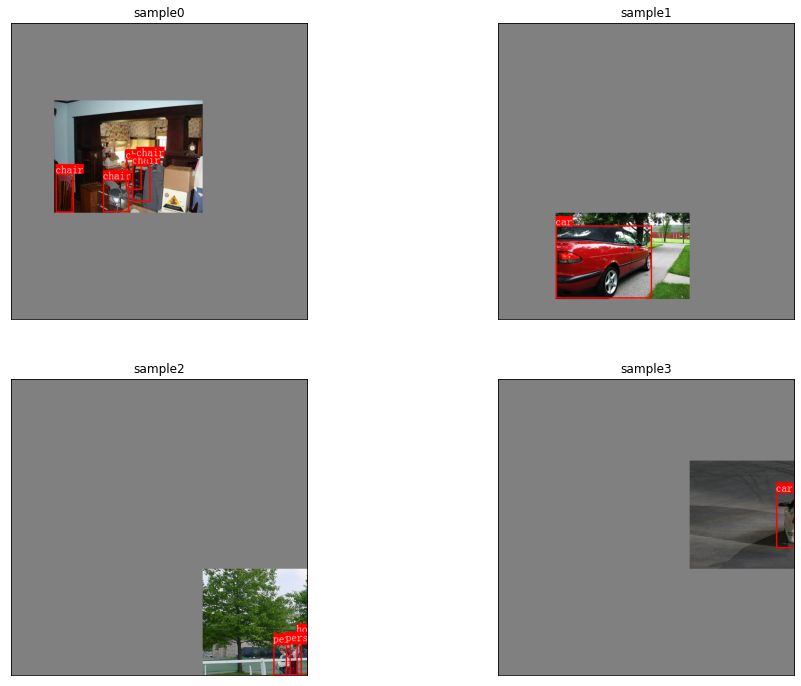
将4副样本进行随机翻转、尺度变换后放置在背景图中的效果
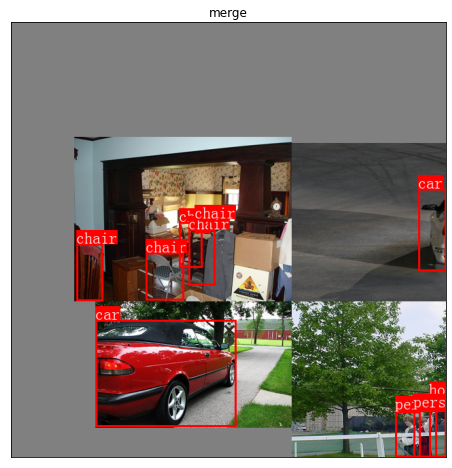
最终合成图的效果